Testing, Environment Variables, aync/await (again) and Promise.all()
Testing
Part 4B in FSO puts a focus on testing your applications. There are four levels of testing:
Unit testing
Tests that focus on specific units or components of the software to determine whether each one is fully functional. A unit can refer to a function, individual program, or even a procedure. White-box Testing method is usually what is used.
Integration testing
Combine all units within a program and test them as a group. This testing level is designed to find interface defects between the modules/functions. It helps determine how efficient the units are running together.
System testing
The first level in which the complete application is tested as a whole. The goal at this level is to evaluate whether the system has complied with all the outlined requirements and if it meets Quality Standards. Usually undertaken by independent testers who haven’t played a role in development.
Acceptance testing
The final level, Acceptance testing (or User Acceptance Testing), is conducted to determine whether the system is ready for release. Users will test the system to find out whether the application meets their needs. Once this process has been completed and the software has passed, the program will then be delivered to production.
It’s a convention in Node to define the execution mode of the application with the NODE_ENV environment variable:
"scripts": {
  "start": "NODE_ENV=production node index.js",
  "dev": "NODE_ENV=development node --watch index.js",
  "build:ui": "rm -rf dist && cd ../../part2/notes && npm run build && cp -r dist ../../part4/backend",
  "deploy:full": "npm run build:ui && git add . & git commit -m uibuild && git push",
  "test": "NODE_ENV=test node --test",
  "lint": "eslint ."
}
NODE_ENV=production : This is what sets the app’s global process.env.NODE_ENV variable.
But what IS process.env? Time to rehash some operating systems concepts.
argv and envp in Operating Systems
When any process is started on a computer, the process has two pieces of data passed into it via system calls:
argv: The argument list (an array of strings)envp: The environment block (an array ofKEY=VALUEstrings) On POSIX systems that useexecve(), it doesexecve(path, argv, envp).
Refresher from CS:APP Chapter 8.4.5
The execve function loads and runs a new program in the context of the current process.
#include <unistd.h>
int execve(const char *filename, const char *argv[], const char *envp[]);
// Does not return if OK, returns -1 on error
-
State: Raw snapshot of everything on a CPU, the register values, condition codes, memory contents, everything going on in the processor in an instant
-
Context: A partial version of the state that only pertains to one specific process. Only holds enough info to perform context switches.
-
Process: A program in execution.
It loads and runs the executable object file filename with the argument list argv and the environment variable list envp. execve returns to the calling program only if there is an error, such as if it cannot find filename.
Unlike fork(), which is called once but returns twice, execve() is called once and never returns.
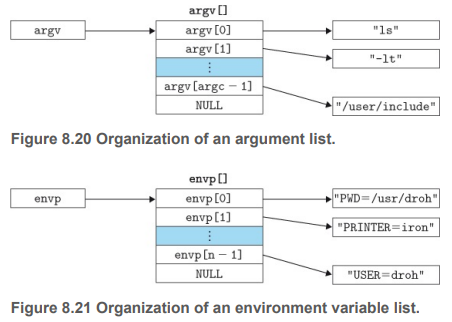
The argv variable points to a null-terminated array of pointers, each element points to an argument string. By convention, argv[0] is the name of the executable object file.
The list of environment variables is represented by a similar data structure. The envp variable points to a null-terminated array of pointers to the environment variable strings, each of which is a name-value pair of the form NAME=VALUE.
NODE_ENV=development node --watch index.js
When a line like this is parsed in the shell, NODE_ENV=development is saved as a part of the environment variable (which includes everything else like your PATH, HOME, USER etc).
Essentially:
execve('usr/bin/node', ['node', 'app.js', '--watch'], ['NODE_ENV=development', 'PATH=/usr/bin:...', 'HOME=/home/you', ...])
Though, --watch never ends up in process.argv. Node does a second pass on arguments the OS gives it and filters out its own runtime flags (--watch, --inspect, etc) and puts them in process.execArgv. So, the process flow is actually as follows:
- Kernel level:
execve()is launched with one flatargvarray - Node bootstrap (Node’s C++ layer): parses the flat array once and splits the strings into
process.argvandprocess.execArgv - Javascript layer: Users only ever see the already split result in
process.argvandprocess.execArgvHowever, note thatprocess.envdoes not get changed in any way by Node!
Anyway, back to FSO. There’s a problem with using NODE_ENV=production in the CLI though, because it won’t work on Windows. That can be fixed by installing the cross-env package and adding it the the npm scripts like so:
"start": "cross-env NODE_ENV=production node index.js",
For database testing, FSO recommended a library called mongodb-memory-server. Though they say that the optimal solution would be to have every test execution use a separate database (can be done by running Mongo in-memory or by using Docker containers).
But FSO won’t be doing any of these and just using the MongoDB Atlas database (shame).
Double dashes in CLI --
They’re used to tell npm to ignore the rest of the options. It signifies the end of options for npm to read. So the options after the double dashes get passed to the tool being wrapped instead of flagging npm.
Basically, when npm test is run on the command line, test gets transformed into what’s written in the scripts inside of package.json.
"scripts": {
  "test": "cross-env NODE_ENV=test node --test"
}
If npm test --test-only was run instead of npm test -- --test-only, npm would try to parse --test-only as one of its own flags, which it doesn’t recognise, hence dropping it (and doing nothing). But -- --test-only would pass --test-only to through npm and to the script underneath. So node gets the flag --test-only (which is a valid flag for Node).
Remember, npm and Node are two completely different things. npm is an executable that manages package installation and a script runner. Node is what executes Javascript code. Both of them have completely different flags.
Async/await (again)
I didn’t touch async/await in much depth in my last blog post. So let’s talk about it much more here.
FSO brings up generator functions that were introduced in ES6 for writing asynchronous code. It looks bizarre, and yield reminds me of await. And generators appear to need a much bigger set up around it.
In ES7, async/await was introduced. Async/await basically wraps promises in a way that makes the code look synchronous. Yes you could technically write code with just promises, but with async/await, it makes code more readable. Each async function returns a promise, and await only works on something that is a promise (or thenable).
Basically, async/await is built on top of promises, they work together to make code look much cleaner.
You call functions with async, and within the async function, await can be used to assign a resolved promise’s value to a variable. E.g.:
// Promise-based
function getUser(id) {
  return fetch(`/users/${id}`).then(res => res.json())
}

// async/await version
async function getUser(id) {
  const res = await fetch(`/users/${id}`)
  return res.json()
}
resolve and reject in promises are only needed when a new promise is first created.
Promise.all
The .forEach method on arrays expects a synchronous function as an input argument. This means that async/await on it will not work.
The solution to waiting for all asynchronous operations to finish executing is the Promise.all method.
beforeEach(async () => {
 await Note.deleteMany({})


 const noteObj = initialNotes.map(note => new Note(note))
 const promiseArray = noteObj.map(note => note.save())
 await Promise.all(promiseArray)
})
First, the notes are mapped into an array of Note objects. Then it is mapped into an array of Promises. After all, each .save() method on a Mongoose document object returns a Promise.
Promise.all waits for all of the array of promises fed into it to resolve before it returns a single Promise. It returns an array of resolved values, in the order it was inputted. It rejects when any of the input’s promises rejects.
In the line:
const promiseArray = noteObj.map(note => note.save())
note.save() returns a Promise immediately instead of triggering an async write to MongoDB and resolving the result. Mapping over all documents results in an array of pending Promises.
In Javascript, any function that returns a Promise (async function or a function that constructs and returns a Promise (like .save() or Promise.all()) returns a Promise object immediately and synchronously. The Promise itself is returned right away, it’s only its resolution (the actual returned value) that is asynchronous.
This is why in .then() we use a function to to access the resolved value:
Promise.all(PromiseArray).then(returnedArr => {})
.then() takes a callback function as its argument, to which Javascript automatically calls that callback with the resolved value once the Promise is fulfilled.
Promise.all executes the promises it receives in parallel (starts the promises at the same time, concurrently). If the promises need to be executed in a particular order, the operations can be executed inside of a for...of block, that guarantees a specific execution order.
beforeEach(async () => {
  await Note.deleteMany({})

  for (let note of helper.initialNotes) {
    let noteObject = new Note(note)
    await noteObject.save()
  }
})
| Previous Post | Next Post |